Bloggerのテンプレートはページ幅が700pixちょっと今となっては狭いので、少し広くして見ました。この変更はCSSの数値を変えるだけでは済まなくJTrim等のグラフィックスソフトが必要となります。
(1)改造に使ったテンプレート:作成者 Dan Rubin Thisway Rose 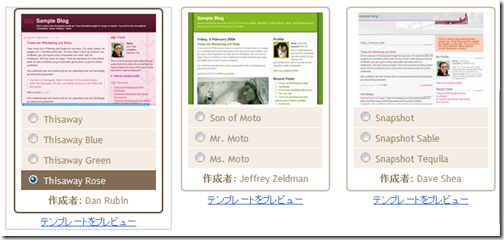
(2)標準テンプレートで作成した場合 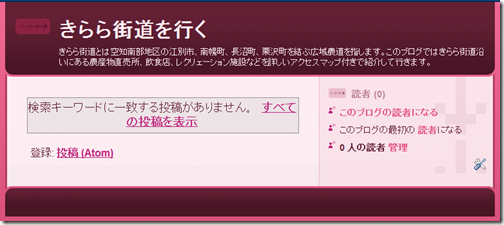
(3)幅のサイズ変更 (ページ幅760→900、メイン幅483→623、サイドは同じ)
●body { margin: 0; text-align: center; min-width: 760px; background: #ce436e url(http://www.blogblog.com/thisaway_rose/bg_body.gif) repeat-x $startSide top; color: $textColor; font-size: small; }
→body { margin: 0; text-align: center; min-width: 900px; background: #ce436e url(http://www.blogblog.com/thisaway_rose/bg_body.gif) repeat-x $startSide top; color: $textColor; font-size: small; }
●#outer-wrapper { margin: 0 auto; width: 760px; text-align: $startSide; font: $bodyFont; }
→ #outer-wrapper { margin: 0 auto; width: 900px; text-align: $startSide; font: $bodyFont; }
●#content-wrapper { position: relative; width: 760px; background: #f7f0e9 url(http://www.blogblog.com/thisaway_rose/bg_main_wrapper.gif) repeat-y $startSide top; }
→ #content-wrapper { position: relative; width: 900px; background: #f7f0e9 url(http://www.blogblog.com/thisaway_rose/bg_main_wrapper.gif) repeat-y $startSide top; }
●#main-wrapper { display: inline; /* fixes a strange ie margin bug */ float: $startSide; margin-top: 0; margin-$endSide: 0; margin-bottom: 0; margin-$startSide: 3px; padding: 0; width: 483px; word-wrap: break-word; /* fix for long text breaking sidebar float in IE */ overflow: hidden; /* fix for long non-text content breaking IE sidebar float */ }
→ #main-wrapper { display: inline; /* fixes a strange ie margin bug */ float: $startSide; margin-top: 0; margin-$endSide: 0; margin-bottom: 0; margin-$startSide: 3px; padding: 0; width: 623px; word-wrap: break-word; /* fix for long text breaking sidebar float in IE */ overflow: hidden; /* fix for long non-text content breaking IE sidebar float */ }
(4)サイズ変更後 
(5)ヘッダー下部画像のURL取得
#header-wrapper { padding-bottom: 15px; background: url(http://www.blogblog.com/thisaway_rose/bg_header_bottom.gif) no-repeat $startSide bottom; }
(6)URLをブラウザのアドレスバーに貼り付け 
(7)画像を保存してJtrimで読み込みサイズ確認

(8)右の余白を140
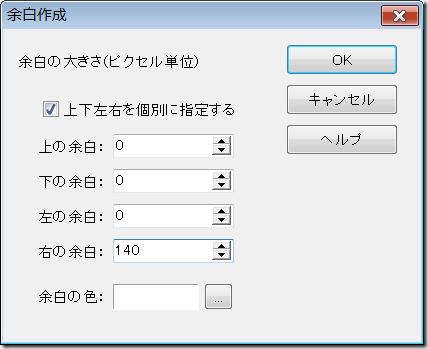
(9)画面表示を400%にし、範囲選択

(10)ドラッグで右端を合わせたら「位置確定」 
(11)同名のファイル名で保存 
(12)サーバーにアップロード(有料・無料のレンタルサーバー)
(13)アップした画像のURLでテンプレート変更
#header-wrapper { padding-bottom: 15px; background: url(http://www13.net/blogger/template/bg_header_bottom.gif) no-repeat $startSide bottom; }
(14)結果確認 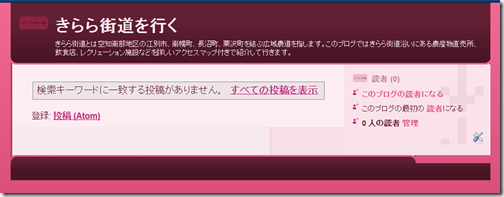
(15)本文部の背景画像のURL取得
#content-wrapper { position: relative; width: 900px; background: #f7f0e9 url(http://www.blogblog.com/thisaway_rose/bg_main_wrapper.gif) repeat-y $startSide top; }
(16)URLをブラウザのアドレスバーに貼り付け 
(17)画像を保存してJtrimで読み込み、余白作成(右140pix)
(18)画像途中にある区切り線を確認 
(19)区切り線のある位置より、かなり前の方からオリジナル画像(760pixの位置)の最後まで選択したら画像右端(900pix)までドラッグし「位置確定」をクリック 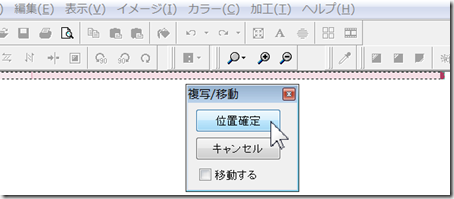
(20)同様に保存しアップロード
(21)テンプレートの変更
#content-wrapper { position: relative; width: 900px; background: #f7f0e9 url(http://www13.net/blogger/template/bg_main_wrapper.gif) repeat-y $startSide top; }
(22)結果の確認 
(23)フッター部背景画像のURL取得
#footer-wrapper { padding-top: 15px; background: url(http://www.blogblog.com/thisaway_rose/bg_footer_top.gif) no-repeat $startSide top; clear: both; }
(24)同様の手順で画像を変更しサーバーにアップしたらテンプレート変更
#footer-wrapper { padding-top: 15px; background: url(http://www13.net/blogger/template/bg_footer_top.gif) no-repeat $startSide top; clear: both; }
(25)結果確認 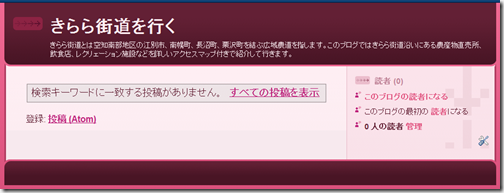
※実際はこのようなレイアウトになります。
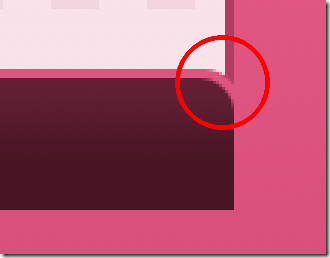
※JTrimでの加工ポイント
エッジのカーブがなだらかになるよう位置合わせを注意深く行なうこと。
●関連ページ:JTrimの使い方
※他のテンプレートも同じ手法でやれますが、小さな画像が多い場合は画像の特定と変更にかなり時間がかかります。
※無料で使えるお勧めサーバー:Google Page Creator、Yahoo!ジオシティーズ
●関連ページ:
・FLASH(*.swf)メニューをGoogle Page CreatorにアップしBloggerで表示
・BloggerにFLASHブログメニューを挿入
Bloggerテンプレートでページ幅を変更するには
2008/10/26
投稿者
Owl
時刻:
10/26/2008
![]()
ラベル: Blogger
登録:
コメントの投稿 (Atom)


0 コメント:
コメントを投稿